How to insert into the opening of a plastic window. Do-it-yourself installation of plastic windows - Pokrokov's technology for mounting photographs. Methods for installing plastic windows, their pluses and minuses
The advantages of installing plastic windows are not less than operational characteristics, but also ease of installation. A clumsy process, making it easier to find the fixings and add-on parts from the factory configuration, the home master can master it all by himself. There are few nuances in it, which dictate to an independent installer scrupulously vikonanniya budіvelnyh order. You will need to be patient, careful and wanting one person to call on the pomіchniki. If you install plastic windows with your own hands, you will be able to vikon without a hitch and practically without a cost.
Video lesson for self-reliant buddies
In front of the wimir and rosrahunki
Before buying a vіkna, ring out the window open, vrakhovuchi, without a quarter of wine. Open the quarter - a characteristic detail of the pino-concrete budovi, which quickly absorbs heat. For openings without a quarter, it is necessary to close the opening, the length of which will be 5 cm less, the lower equal parameter will open. Three values of the width require a width of 3 cm. Clearances along the contour of 1.5 cm are required for fitting, additional 3.5 cm from the bottom are required for lifting. Guests are advised to lick around the perimeter of 2 cm.
For oblashtuvannya otvoryu z quarter vimiryuvannya carry out for a narrow space. Vіkna zamovlyayut, until the width of 3 cm the value does not change.

The windows ring out over the middle of the opening, and stepping into the outer flat by 1/3 of the deep. Ale, for those who live, you can install a plastic window with your own hands, but there are options for the shifting on the other side. It is necessary to protect the surroundings during the zamovlennі pіdvіkon and zovnіshnіkh vіdlivіv. Before calculating the cost of roztashuvannya vykna pokazniki in the width of both elements, it is necessary to add 5 cm each.
On the rozrahunka of the width of the podvykonnya, the roztashuvannya of the battery is also poured in. Vin may less than half-curve the radiator. Plus 2 cm for laying the foundation of the veil. The minimum margin for length is 8 cm, but better not be stingy and add 15 cm, so that you can beautifully visualize this detail.
Give respect. Bichni plugs made of plastic are added to the pіdvіkonі and vіdlivіv. Don't be inspired by them.
Ways of fastening ramie
The installation technology does not contain any number of internal chambers in metal-plastic profiles, or any number of chambers in cladding packages. To lay it out according to the material, from any building wall, that from the dimensions of the window. From the list of reconsiderations, choose the method and attachment of the attachment.
It is possible to fix the plastic window construction:
- mounting anchors or dowels, which are inserted into the wall through the open opening;
- with special toothed plates, which are squeezed into the profile, the stench does not penetrate into the wall, but is installed in a vrozpir and fastened with screws.

The first way is known as the founding one. Vikoristovuyut yogo is important for the installation of great and important window systems. With a sharply reinforced window, it is stably repaired by numerical shock stresses, which, for example, are blamed for the operation of windows with chairs, which are opened at two different positions. Before that, passing through the frame across the anchor allows more precise adjustment of the vertical and horizontal structures that are being installed.
However, if you want to find out how to properly install plastic windows of small dimensions from blind folded packs, you can fix the fixation method with anchor plates. Starry look Vіkna stink not zіpsuyut, to that scho we will be hooked under mowing.
Porada. For the installation of anchor plates at the concrete or concrete opening, there are small diggings, so that it was not possible to apply a sealing ball, which is visible, before installing the internal slopes.
Often alarmists combine offensive methods. The anchors are buried at the wall through the side elements of the ramite through the bottom profile (the base of the window), and the top is fixed only with plates. If you do the installation of plastic windows with your own hands, go through a wooden bathhouse, the anchor plates are rarely beaten, the stench can spread. Replacement of anchors and sometimes fixing galvanized screws.
Specifics of installation near a wooden house
Rich in the installation process, the type of material is added. As for the walls with pinobeton, hollow or resurfacing, the strengths of the pillars are less likely to be buried in the anchors, then up to the openings in the logs from the decks and in the timber walls of the pillars of the features. It’s not only necessary to heal, but even more so if it’s easier to install plastic windows in wooden ones, which will open the same way it’s necessary to grow.
- Oblashtovuvati vіknami іz plastic derev'yanu Budova can be less through the river, rather through two rocks after the completion of life. Tsya significant break is necessary through postbudive shrinkage. The smallest period of shrinkage and її rozmіr for buds from glued beams.
- Installation is not carried out in the open without any middle. You can insert a window into a wooden box, which protects the window structure from deformation. On the viconny block, it is not to blame for the damage, defects and rot. Before the cob, yogo needs to be treated with an antiseptic.
- Shrinkage, it's true, already not the flooring is intense, it will take place after the installation of the window and the improvement. For reasons of why between the upper plane of the opening and the box, fill a gap of 3-7 cm. The gap after the installation of the window is filled with jute insulation and is covered with excess from both sides.

There are no exact recommendations for the material to be used in budivelnyh standards wooden houses. Look at the sound of the vicorist standard, applied to the window construction. Pіdvіkonnya can be as polymeric as it is wooden. It is not fenced, so that the bottom profile is spiraling right on the wooden floor. Tobto, before mounting the wines, you can buti.
Є nuance, not delusional by the standards, but recommendations by the informed alarm clocks, who knows how to correctly insert the plastic windows. Wood, building to pass viparovuvannya, accept the reduction of the technical capacity of the assembly stump. In order to prevent the pin from being "blown out" around the perimeter, it is necessary to equip the upper block of the bridle of the line with the applied bazhan with a foiled polyurethane foam line.
Standards for the installation of vicons from plastic
The characteristic feature of the technology is the choice of mounting pins, which gives the rigidity of the frame-holes. Taking away from the result of polymerization, the ball immediately loses the function of insulation and additional reinforcement. In order to ensure that the element has the necessary technical characteristics, the ball should be filled with insulating balls.

If it is better to insert a plastic window, the Lord himself is guilty. It is not uncommon to recommend winter installation through a negative development of all faults. When choosing a mounting stump, it is necessary to thaw the shoes, at some values of atmospheric temperature, the warehouse is stronger than hardness. Vіddati perevagu professional pin, and for work with negative indications of a thermometer, it is necessary to buy a special nozzle.
How to win the zapіnyuvannya, it is reportedly described by the virobnik in the application before the production of the instruction. Zapіnyuvati zazvichay start from below, protruding with rotary-circular ruhs uphill. To turn off the overheating of expensive material, blow out the sprat pins with 25-30 divs each.
Porada. With the method of using the dew point, zapіnyuvannya vykonuyut with an uneven value. Zverneny naming the ball of the pin to recommend the work of the smaller ones, the lower internal ones. Along the perimeter of the pin, it is necessary to blow out evenly, without empty and overflows.

Preparation of the window opening
No saw, no smittya, no surplus farby in the open is not guilty of buti - tse obov'yazkova mind. Home smart people, like nobles, like inserting a plastic window into a wooden house, need to cut the upper “unfavorable” ball, so that the installation will be carried out in a box, which has already served. Pina mitsno zchepitsya from the top ball. If you suspect that you will be able to see the wine, it is better to use it.
Porada. Gap between the frame and the lapel fill only with pins, as if you do not exceed the limit of 4 cm. If you enlighten more, often fill them with cheap material: gypsum board, ribbed timber, polystyrene, whole thinly.
Preparation of a plastic window
- Swing the back of the frame into the chair, for which the pin is pulled in, inserting at the top loop. Pidchepit yogo need to be neatly lowered with pliers and a twist. Sweat, lift the trochs, lift the chair from the bottom loop. From deaf vicons, sklopakets are wielded, in front of them, taking later, then transverse glazing beads. To remove the glazing bead on the lower side, or the spatula should be carefully inserted into the gap and slowly closed, trying not to mess up.
Give respect. It is possible to insert a plastic window of small dimensions behind the additional mounting plates without using chairs or folded bags. Even though it is possible, it is not necessary to damage the integrity of the factory design.
- Sklopaket or stool under the hood to close to the wall, placing on a flat surface, covered with cardboard or soft material.
Respect. Plasma is not possible! Put skewed tezh. The most important stone under the foundation will become the cause of cracks.
- Zovnіshnyoї surfnіtі ramі vnіmіt plіvku. If you don’t see it all at once, then you’ll be richer and smarter and you’ll have a chance to win a wake-up hair dryer.
- Nezalezhno vіd type of selected fastening, mark the place for this installation. Non-committally recommended by the alarmists, the croc is 40 cm (it can be a little less), which is allowed by GOSTs with a maximum of 70 cm. Bolt under the anchors or open the old screws, roztashovuyuchi drill on metal from the outer side of the frame.

More video-instructions, as they teach, how to independently install a plastic window, dictating the fixation of the PSUL line before installation. Prote narodnі miltsі, yakі zіtknulis її її її glutinous "unhandled", perekonuyut, scho wiser її attach after installation.
Straightforward installation process
- Insert the frame into the opening, placing special plastic wraps around the perimeter, or small bars, to secure the technological space. Slightly shifting wedges, set the frame clearly horizontally and vertically with even side gaps.
Porada. Rozpіrnі pristroї bazhano roztashuvati order with a point of fastening with a self-tapping screw or an anchor. The stink to protect the frame from deformation.

- So, as the installation of pvc vicons with your own hands can be done for the help of various reinforcement, at which stage the authorities are declared.
- At the opening of the wooden booth, through the opening in the frame, screw in the self-tapping screw. It is not necessary to screw it all the way in.
- On the walls with pinobeton or ceglin through the open in the frame, designate speckles, then clean up the frame, drill open with a drilled material. Let's turn the frame on the plate, make it fastened.
- There will be no need for underwire manipulations with the frame when mounting on anchor plates. You just bend them so that the stench sticks to the place recognized for their strengthening.

- Residual reinforcement is carried out after the control of horizontals and verticals with equal and scale. It is impossible to get out of the tightening, so that the frame does not begin to buckle barrel-like. Complete the screwing, like a few drops, stand up to the level of the frame. Installers recommend to leave 1 mm above the surface.
- To turn the dismantled parts on the spot at the turning point and reverse the practicality of the design.
- Fill gaps with pins. Close the bells on the inner side of the zipper with stitches. It is necessary to “drown” the sound of the insulating line in
- Pіnoy zapovnіt promіzhok pіd vodovіdlivom. Install the yogo with a fistful in the window, attach it with screws to the bottom profile.
- After the polymerization of the stump, it is necessary to install a riser. Plastic variant for 2 cm wind up under burkun. In order to create an insignificant trick in the air, you can also fill in the open air.
- Mow the bazhano zrobiti on the day of installation. The maximum break is 3 days after the installation.

After the completion of all operations for 16 years, it is not recommended to coristuvatise, so as not to damage the integrity of the installation seams. To know, how to install a plastic window, it is necessary not only for master rulers. As the master of the zamіsk volodin vyshit zamovite servitors of the small brigade of installers, you also need to take into account the specifics of the installation.
Buying and installing new windows is not cheap, moreover, a significant part of the cost falls to pay for the installation. You can speed up vitrati by scoring a part of the robot with a hand. Mirozpovimo, how to install a plastic window independently, having wound a cover instruction from a photo.
Vimiri, necessary for the preparation of a plastic window
In addition, you need to build up the vimiri correctly, to lay lightness in the future, with which you see or don’t see. Adzhe prepared a viconny block larger size, You will be embarrassed to open your mouth, and having mercy on a lesser bik from roses, you will grow.
It is necessary to signify the expansion of the future frames, depending on the type of vicons, as if they were:
- from the quarter, tobto with a ledge at the pivcegli, which is known to the bell of the opening and in which the window box rests. Such vikna is practical for all typical life;
- obvious, i.e. without speaking. Such a design wins in the future, which are sporadzhuyutsya for individual projects.
Vymiryuvannya zvechayny vіkn
Measure for the help of a tape measure the width of the window opening, add 5 cm to these indications (on the mounting pin) and write down the deducted data. Krіm dimensions of the window box, it is necessary to measure the depth of the cuts, as well as the depth and the length of the riser. The remaining parameter is covered, depending on the distance between the vertical slopes, until 8-10 cm are added.
Vymiryuvannya vikna z quarter
At this point, it is possible to reduce the horizontal and vertical edges of the protrusion and add up to otrimanih numbers of 5 cm on the mounting pin.
More details about the nuances of the video distribution:
When making a metal-plastic window, do not forget to discuss with the picker the number of folded packages and the size of the profile, as well as a list of the number of fittings and roofing elements. If the climate of your city is not disturbed by the weather, and the window does not go to the passing part, boldly close two cladding bags and a profile with a width of 6 cm.
The procedure for dismantling old frames
shob install the plastic window yourself it is necessary to pozbutisya in the presence of yogo wooden front. Dismantling should be done carefully, so as not to unfold half of the wall, so that later we will be able to reinforce, spend an hour, a penny of that strength. If you keep in mind about the safety technique, even if a robot is less traumatic, and the least pardon can be brought to a drug lizhka.
Raise the back from the loops of the parts of the vicons that are being twisted. Wiymіt sklo, taking the glazing beads in front. For the help of a grinder or hacksaw, you can open boxes and other parts of the vicon block.
Vykoristovuyuchi montuvannya, vyymіt elements of the old design from the opening, which is resolutely cleared in the wake of a wake-up call and a saw.
Now the time has come to find out how to install a plastic window independently.
Do-it-yourself installation of a plastic window: instructions
To install the plastic window independently, prepare the tools and materials that you need during the installation:
- self-tapping screws (4x35 mm, 4x25 mm);
- screws (5x60 mm, 3.8 x25 mm, 3.9 x25 mm);
- anchor plates;
- mounting pin;
- waterproofing and vapor barrier lines;
- mounting wedges;
- vіdlivi;
- pіdvіkonnya;
- temple;
- rіven;
- PSUL;
- perforator;
- screwdriver;
- twists;
- a hacksaw with a sharp tooth for trimming the undercut;
- scissors for metal, to cut it sharp.
Before installation, remove the chairs from the vicon block.

Install mounting plates. The order is as follows: spread the plate at the end of the vicon block, after which turn it with the last end at the side of the place, fix it with a screw (4x35 mm).
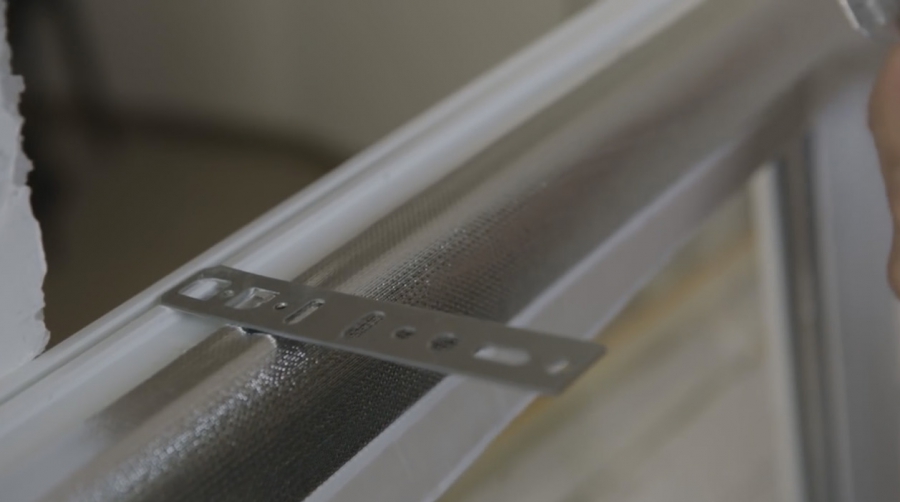
Respect for respect: standing between plates is not guilty of overshooting 600 mm.

The first step is to proceed before the construction is installed in the opening, it is necessary to apply marks for the fastening elements and PSUL. Align the position of the structure in the opening (the axis of the navishcho need shils and ribs), and step on the foot: the maximum expansion in the horizontal or vertical is not guilty to change in the margins of 1.5 mm per 1 m of the structure, but not to exceed 3 mm for the entire length or the width of the width. Fix the frame by locking the mounting wedges.

To bend the plates and signify an olive oil on the mowing, de stench to cling.

If it’s a window from the quarter, then on the outer side of the frame, mark the outline of an adjacent opening.

Wiymіt frame, and drill open in the places you have indicated, where we will insert the anchor wedges.

Drive the dowels into the open.

For the help of the shield, that pylosos pozbavtes saw. Stick a stitch on the frame. As you can see from the right side of the window from the quarter, the stitch is glued to the outer part of the frame on the 3-5 mm gap, according to the outline of the opening outlined earlier.

In windows without a quarter, the insulation of the outer seam is fixed with the use of special sealants in water insulation already after the installation of the structure.
Close the window block at the opening, vicorist mounting wedges and do not forget to control the correct position.

Fix on one upper side plate and cut the diagonals of the window block. Your retail is guilty of being in such boundaries:

Screw the plates that are missing, and remove the wedges, having filled only the lower and diagonal ones, after which proceed to zapіnyuvannya.

Trim the excess stumps and stick on the side a vapor barrier line, overlapping on the wall at 10-20 mm.

Calls to attach a waterproofing line.

Install vidliv. Insert yoga into the groove and fasten it with vicorist screws (4x25 mm).

Hang chairs, after which install a lift. At times, adjust the handles.
Axis bachite, install the plastic window yourself not so difficult. Golovnya - mother bazhannya and cherish our joys.
Take your own, tell your friends!
Read also on our website:
showing
Today's trend is to replace old wooden windows with plastic ones, becoming more and more wide. Such victories may have a low advantage, as if they remember their competitors among them. As a rule, the installation of vicons is carried out for the help of fahivtsiv, as they run into the tasks set for the treatment of the year. Vtіm, shvidko not zavzhd means good. An hour at a time, the masters forget about the different drіbnitsa, and if they do, they will be able to do it on their own. To avoid such a "professional" installation, you can install plastic windows yourself. Golovne rozpisati chitky plan for diy and dotrimuvatisya all yoga points.
Vimiryuvannya vikna
We need to measure the width and height of the window opening. Width - tse v_dstan between the inner parts of the wall - slopes. Vysota - rise between the upper mowing and the lower ones. After omitting the expansion, you can calculate the expansion of the window. For the selected width, you need to choose 3 cm (1.5 cm gap from the skin side). The height required is 5 cm (1.5 cm for the clearance of the top and 3.5 cm for the installation of the lift).
Rozmir pіdvіkonnya that ovnіshny vіdlivu vіdlyu razrakhovuєtsya z urakhuvannymi gap in 5-10 cm. The width of the vent can be such that the vents without bending the scorched radiator are 1/3 more lower. Zamіri mowing is carried out without delay after the installation of vicons, the scallops of the backyard will signify their expansion smoothly.
Select material

Selection of plastic vicons is carried out according to decal criteria. In the first place, it is necessary to be appointed from the principle of strengthening the frames. There are two types of wine:
- through the frame in the packing area;
- for help behind the back of the mounted supporting reinforcement.
The first option for installation is more important, but at the same time and foldable. The principle is based on unpacking the package. Slowly wiymaєtsya with ramie. Then the frame is inserted at the opening and attached to the wall for additional anchors. At the ready, the frame is re-inserted with cloaks. This way allows you to change the vikonna design, prote pіd h installation zbіlshuєtsya risik poshkodzhennya skla.
Another way is to install windows without their front unpacking. At to this particular type metal plates are fastened to the window frame behind the back, for the help of these windows and mounted in the opening. Such a method is simple, but the difference is significantly lower compared to the first option.
Another criterion for choosing plastic vicons is the quality of the material. First, give respect to the reinforcing profile, which is the basis of any future. Vіn maє buti vygotovleniya vykljuchno s galvanized steel. If it was broken for a long time from zastosuvannyam of other metal, then they gave wines to be covered with irzhey and ruddy patioka to appear on the windows.
Not less important is the choice of the slopet itself. For non-salting accommodation, you can choose a single-chamber package, for an apartment, a house, or an office, it is better to use two- or three-chamber models. The most difficult thing can be simpler, but with infrared filings. ICH-skla, to the point of speech, become a miraculous solution for vicons that go to the skhіd. Іnfrachervoni promenі zdatnі vіdbivat warmly, navіt nіzharkіshі summer days the room will be comfortable.
Preparation of work before the cob installation

Before the beginning of the installation of a new window, it is necessary to dismantle the old one. Fight in stages. The back of the head with viconnoi frames is folded down, in front of the chisel glazing beads, like a yogo trim. Even if you don’t work for an hour during installation, it’s possible to break and injure you. They gave the need to saw the frame. You can do it for the help of a great saw, as well as for the grinder’s stasis. However, keep in mind that a grinder can be beaten for the obviousness of a diamond disc or a disc for concrete. In order to avoid injury, it is categorically defended to beat the wood and metal discs. After sawing the frame into parts, you can proceed to dismantling, using a perforator, a crowbar or a flower.
The onset of the stage is close to the sight of the old pіdvіkonnya and vіdlivu. If the stench of wood is, then for dismantling it is necessary to use the same principle as for ramie. It is necessary to cut the pieces into sprats and pull them out one by one. With concrete pіdvіkonnyam, do some folding things. You can only see yoga by breaking it into pieces in front with the help of a hammer.
Having known the old age, you can proceed to the final preparatory work. Vіkonniy otvіr need to be thoroughly cleaned from the budіvelny saw and smіttya, scho settled in the process of dismantling. Zrobiti tse it is possible for the help of the great pylososu. Also varto tidy up the leftovers of the old insulation and mounting stump.
After all the work carried out, the surface of the window opening should be coated with a primer. Dali in the lower part of the upcoming century, so the ranks of the substaff profile are being established, to what extent the fold itself is creaking. The profile is closed for an additional mounting pin.
Installed window

As for the installation of a plastic window, using the method of unpacking a squeegee, the process will be carried out in a stepwise manner. It is necessary for us to win the slopes with viconna frames. For whom, one by one, mustaches of glazing bead are carefully drawn, zavdyaks are trimmed with glare. Potim sklo under a small arrogance smoothly wiymaєtsya z ramie. After unpacking the sklopaket, it’s better to clean it up to the next room, so as not to harm the installation of the frame.
For the cob of the cob, it is necessary to install the frame on the prepared wooden wedge. It is necessary for the frame to take the necessary position and not to miss the hour of installation.
Having used the drill, at the frame of the brable, open the bottom of the anchor (open three from the skin side). Having checked everything, open it, varto perekonatisya, so that the frame did not budge. For whom you can speed up with a chip and a laser level. The traditional bulbous rhubarb is better not to be stagnant, because wine does not give the most accurate measurements.
Having perekonavshis, that all indications at the norm can be attached with anchors. For whom, having punched with a perforator on a level opening, but already in a frame, it is necessary to open a similar opening in the wall, with a depth of at least 6 cm. After the skin anchored anchor, the veneer is re-evaluated again.
At the stage of installation, the window frames are installed vertically. To fasten the vins to the supporting profile, which is a backlog of installations under the frame. It is necessary to drown the edges into the wall, having pierced in front of it, open it. For installation purposes, all sidings and cracks from the outer part of the window are sealed with a sealant.
Vkonavshi all pererakhovanі more manipulations in the frame can be inserted sklo.
The installation of a plastic window without unpacking is carried out according to a similar principle. Vіdminnіst this process is less than the fact that the package is not understandable at times, but is mounted again. The fastening of the vkonnoy design is carried out without fixing the anchors, and behind the help of special plates.
Likewise, as in the first fall, the sklopaket is installed on the back of the preparations of the profile and wooden wedges. Then we will vikno virіvnyuєtsya and revіryaєtsya equal. Metal plates are fastened with screws to the vicon profile. The stench can be linear or P-like. Vіdstan mіzh plates can revisit 7 divas.
The plates are so called ponytails with openings for anchors. Under the hour of installation, the tails need to be bent and firmly pressed to the wall. A dowel is inserted into the opening and, for an additional drill, it is mounted in the wall. Anchor fastening at this slope is carried out straight from the bottom uphill. At the skin stage, the screwing of the dowels can be done through the leveling.

Installation of a subway

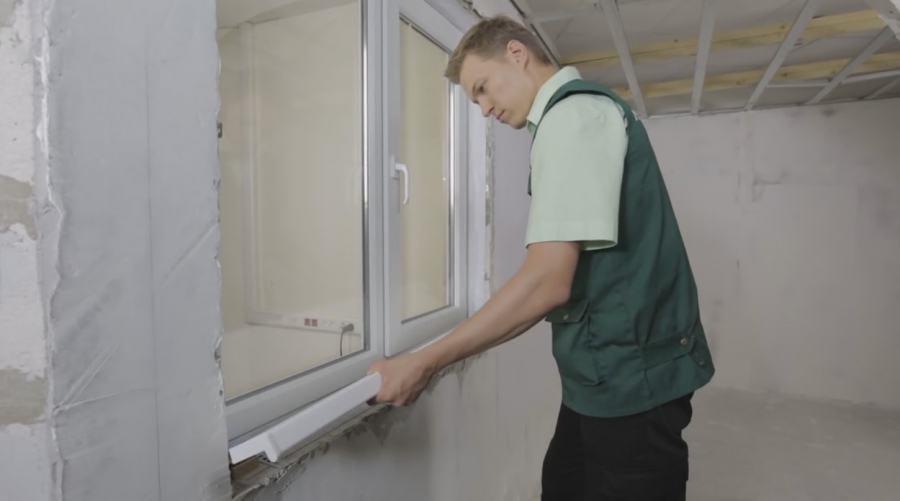
The installation of a metal-plastic pidvіkonnya starts from cuttings. The shape of the underlay is to be such that the vines are easily opened at the side and, at the same time, sticking strongly to the profile of the underlay. It is necessary to close a small gap (about 1 cm) between the side walls of the window box and the window, which can be closed with cuts.
You can proceed to yogo strengthening with a proper rank. For this pіd vіdvіkonnya insert a sprat of wooden wedges, yakі save it from usunennia. Let's sweat the space, which, having settled down under it, will be filled with assembly pins or cement roses. With this, it’s necessary to put some kind of vantage on the pіdvіkonnya, so that after hiding a small trick. Tsya manipulation is necessary for the introduction of condensate.
If the pins of the cracks are hardened, fasten them to the window frame. Fight for additional screws from the inner side.
mow down

The decoration of the cuts is the final stage of the installation of metal-plastic windows. Zrobity їх it is possible either for additional gypsum board or from the installation of PVC panels.
Mow with drywall visible in quiet weather, if the surface of the inner part of the window opening is not subject to winding. Robbing like this, cut it in this way:
- along the edge of the window frame, a special profile L is fastened;
- the inner part of the profile is filled with sealant;
- at the groove of the profile are inserted behind the back of the preparation of the gypsum plasterboard;
- the empty space between the wall and plasterboard is filled with mineral wool;
- the place of zіtknennya mows with a wall covered with glue.
Mows from PVC panels are easier to install, prote їх varto zastosovuvat less on ideally even surfaces. Fight like this:
- іz pvc panels vyrіzayutsya smugi nebkhіdnogo rozmіru;
- for the help of rare flowers, the blanks are fastened to the working surface;
- the ends and sticks between the cuts are covered with special plastic wraps.
New-fangled euroconny boom this year has swept the majority of people. You can talk for an hour about the pluses and minuses of plastic windows, and even if you see them, you can get involved in their installation. Take care of the installation yourself, or trust the professionals to help you. The first step is to make your choice, we should know the material, how to correctly insert the plastic windows, so that the stench of the trivaly hour will take care of your homeland, the heat protectionist.
For the cob vivchimo stages of preparation for work, so you can calmly vikonate yourself:
- freeze the windows open;
- to dismantle worn-out vіkonnі designsії;
If you don't need to be convinced in your own strength, without intermediary installation of PVC windows, it is still better to trust the fahivtsy.
Vimiri
Lie down until the process of znyatya vimіrіv sіd vіdpovіdalno. Obov'yazkovo vrakhovyte, scho open vikon buvayut 2 types: from the fourth and without.
First option it is necessary to measure the width of the opening in the narrowest space between the quarters and to the maximum value add 30-40 mm - so you take the width of the window construction. Dalі perekonaytes, scho rozrahunkovy width vіkonny block exceeds the maximum vіdstan between vertical quarters. To be distinguished by the height of the window, it is necessary to measure from the horizontal upper quarter to the lower quarter of the window opening. You have taken away the opening of the window block to be larger than the outer opening of the window, so that the gaps between the edges of the opening and the window box are not settled.
For another option in order to take into account the dimensions of the window block, the following values of the vertical size of the opening are 50 mm, and of the horizontal - 30 mm. In case of need, it is necessary to signify with the rozmirs of the vykonny pіdvіkonnya and vіdlivu z urakhuvannya coming moments:
- The width is dependent on the protection of the braced method of insulation, or the opening of the sheathing of the structures that are protected (sound when you protrude the name by 50-100 mm from the surface of the wall).
- The width of the riser varies depending on the functional purpose (there will be embellishments flower miners chi ni, then). Often a protruding part of the underbelly of the troch hides the scorched radiators.
- Dovzhina pіdvіkonnya is due to buti approximately 100 mm larger than the width of the opening of the vіkn (the edges of the vіknіonya sink into the empty mowing by about 50 mm).
Zamovlennya vіkonnogo block

After the completion of the offensive stage - the construction of a new PVC window, with which the design of the overall dimensions of the structure, it is important to check the offensive indicators:
- type of sklopaket (one, two, three-chamber);
- type of window profile (trioh, five-chamber);
- the presence and the clarity of the elements of fastening and other supporting fittings for the window construction.
Dismantling the window

Kroki for dismantling the vicon block, which is to be replaced:
- In the month of the dismantling, the next step was to remove all the necessary alterations, whether it be furniture or objects.
- Vіkonniy block nebhіdnіt vіd vіd kvatirok і stools, scho vіdkrivayutsya.
- Farther, at the vіkonnіy construction, there are folds and glazing beads, which will trim them.
- For help, hacksaws or grinders, which are in the state, drank on concrete (from the wind circle) in horizontal and vertical bars of ramie.
- From the stagnation of a naked booth with a handy tool (hammer, bruht, mounting), the old frame is pulled out of the window opening. Krim vіkonnoї ramy, slid to dismantle pіdvіkonnya and vіdlivu.
- Vіkonniy otvіr is cleared and virіvnyuєtsya.
- Let's take care of the Admissions, picking up the mess that has happened.
For bazhannya, you can dismantle the window frame without її ruining, to preserve the integrity, but also vymagaє in the knowledge of the Crimea, I will see that significant time. Robiti all operations from the destruction of the old window block should be done carefully, so as not to be injured, while incapacitating the change in the name of the window.
Installation process

The whole process is composed of low cycles:
- Remove the plastic veils from the hinges of the hanging chairs, as well as dismantle the stacks from the deaf chairs.
- Next, carry out the front rosette and sealing of the opening for fastening.
- Then, the window frame is installed at the opening and folded along the perimeter (horizontally and vertically).
- For the help of anchor bolts, the frame should be superficially fixed at the opening. The skin side of the ramie slid krіpiti with crocodile 70 div.
- Dali it is necessary to install the correct ones. The stinks are stalked under the necessary rozmіri, and then they are mounted on the designated place.
- In addition, as a new PVC window was installed and superficially fixed, as well as mounted, with a special assembly foam, sealing the assembly seams. That is why the whole expanse is filled with a pin, which, having settled between the walls, will open that window frame.
- Dalі vykonuєtsya installation pіdvіkonnya. For the help of a grinder, saws with a shattered tooth, or an electric jigsaw, are upgraded to the point of need. After that, put up for the equal on the preparation of the wooden pidpirki and zapіnyuyut with the assembly pin. Ale to the cob of zapіnyuvannya to exclude the possibility of deformation of the pіdvіkonnya (with expanded pins) at three points on the surface, it is necessary to install some kind of vantage with a vag approximately five kilograms each.
- Through the booty, the surpluses of the stump, which act, are sprung. Tse can be cut with a clerical knife.
- Mows of the inner opening can be sewn up with drywall, puttied, or can be decorated with plastic panels. The sticks between the panels are curled with special folds and then scalded with rare plastic.
- At the final stage, installation of sklopakets and installation of chairs at the frame is carried out. Handles are attached to the hanging chairs, the fittings are adjusted and the window hinges are closed with special decorative caps.
Now you can clean up the wake-up call that has accumulated, and organize a presentation with your hands of the installed plastic window.
Video
Below you can marvel for yourself report instruction from the installation of plastic vicons:
A photo


Plastic windows deservedly deserve the reputation of functional, durable, durable and aesthetic designs. The stench is becoming more and more popular, and it is vpevneno vytіsnyat zvichni for the rich people of the wooden window.
Plastic veneers have gained a reputation for small, durable and superior designs.
Up to їх dodatkovyh advantages can be seen those who for the great bazhanya practically whether a person can install plastic windows independently. І tse great plus, because for the installation of fahіvtsі ask for money. In addition, having figured out how to install a plastic window, you independently control the entire process and you can work everything up to technology.
How to signify the expansion of the future plastic window
The first step is to replace the plastic veneer, it is necessary to sort it out, which may be the design. I begin preparation stage zі znyatya vymіrіv. In the case of an independent vykonanny, the house master is guilty of nobility, that it is necessary to open the door without a quarter. The order of vimir proreziv of two different types can also be considered.

Option from the quarter before the transfer of the winners of the deaths in this order. The back of the head needs to be frozen open between the quarters at the widest point and added to the maximum value of 3-4 cm. This will be the width of the structure. Dodatkovo perekonaytes, scho even the width of the possible plastic window exceeds the largest width between the vertical quarters. In order to determine the height of the future window, measure between the lower plane of the opening and the upper horizontal quarter. So you assign the required value.
If you want to install a plastic window in the opening without a larger hole, to determine the size of the window, you just need to choose a height of 5 cm, and a width of 3 cm.
Dodatkovo vyznachte, what kind of rozmіru can be buti podvіkonnya that vіdliv, as you plan to replace them. During this operation, it is not guilty to blame the daily complications, it is not necessary to protect such important factors.
With the specified width, the footwear will be insured for the future thermal insulation and lining. The standards are responsible for protruding from the vertical wall by 5-10 cm. For example, if you want to put on a new apartment in the miners, it’s better to replace a wider design. Most often, when picking up the fire, the fireworks are carried out in such a way that the free part of the element overturned the batteries of the scorching.
Dovzhina podvikonnya may be 8-10 cm larger, lower opening width. The edges should be drowned at an empty mowing not less than 5 cm lower.
Turn to hell
Confirmation of work and preparation for work

At the next stage, it is necessary to work together with the removal of veneers to a company that specializes in the production of plastic veneers. To the point, if you don’t want to spend an hour to freeze, or you doubt that you can do everything correctly, take this service in the company. Most of the firms propouє її bezkoshtovno for the mind, what will always be promised from them.
Crimium rozmiriv vykna, you need to specify the following parameters:
- The number of cameras at the sklopaket.
- The number of cameras in the window profile.
- The presence of fittings and the necessary fastening elements.
The consultant reported on the specifics of the skin option. You can get ready ahead of time. So, as in your region, the winters are not too cold, and on the streets outside the window it’s not too loud, if there are enough windows with two glasses and a profile 60 mm wide. Further on, focus on the specifics of the climate and the more sharpened.
For independent installation of a plastic window, you need the following:

For the installation of vicons, you need: a hammer, a drill, a screwdriver, a bud_velniy rіven toshcho.
- A gun for a mounting pin and a pin itself.
- Drill with frequency control wrapped in perforation mode.
- Small juice and hammer.
- Metal knives.
- Gostry lower pidide and stationery.
- Budіvelny rіven.
- Chisel.
- Grinder.
- Zvyakhoder.
- Electric jigsaw. For the presence of this, you can win a hacksaw with sharp teeth.
- Putty knife.
From materials dodatkovo buy:
- Rich bud glue.
- Wooden beam with a 150-200 cm thick dove and 2x4 cm dimensions.
- Dowels.
- Plastic wraps and panels from the same material.
- Self-arrivals of different roses. Ring out vikoristovuyutsya 6x40, 2x16, 2x80.
- Retailers.
- Sumish for plaster.
- silicate glue.
Turn to hell
Do-it-yourself dismantling of the old window

At the cob stage of changing windows, it is necessary to dismantle the old window structure.
If a window has already been installed in the premises, then before it, as if the installation of a new window has been installed, it will be necessary to get rid of the obvious design. If you don’t plan to install the old window anywhere, you can’t help yourself to be careful, but you can’t make yourself safe. To do everything so as not to get hurt and not to let the name in. The rest of the rule is especially relevant for apartments with richly-covered booths, because you can fall on someone or harm someone else's power. That tidying up at a private booth will not bring you the desired satisfaction.
Rack up the quarters and chairs, which are opened. Viymіt z designsії all sklo, in front of taking utrimuyuchi glazing beads. Take a grinder with a stake on concrete or a hacksaw. For an additional tool, they drank on the horizontal and vertical elements of the window frame.
For the help of a handy tool - pidide mounting, a crowbar, a hammer - to win the swivel from the opening. In a few cases, if the vlasnik wants to save the old one, the construction can be reached without deformation and little. Ale on tse need more money for more than an hour that singing novice.
At this stage, the old wind and subway are dismantled. At the end of the day, the opening is resolutely cleared by the saw of that various budivelny smittya.
Turn to hell
Pokrokov's instruction on how to install a plastic window

Step by step, you went to the main stage of work - the installation of a new window. Tsya robot vymagaє telnogo and poslіdovnogo vykonannya whole retelling of different entries.
I'm going to finish the preparation of the window before further installation. At this stage, you need to fasten to the end of the upper and side parts of the frames of the roofing plate. Nadalі zavdjaki їm design utrimuvatemeetsya in the necessary position. Often, installers replace the plates with underlays, so that they can stop when installing different gypsum plasterboard structures. Ale, when installing a plastic window, it is richer to add vicor to the plate itself. Von mіtsnіshі, nіzh pіdvіsi.
Planks need to be fixed to the end of the frame. When installing the reinforcement, it is necessary to move it into the body of the metal profile of the block. І zrobleno tse may be buti so that the sklopaket is not deformuvavsya. The fastening is tied to the victories of self-tapping. Choose the diameter of these windows according to the dimensions of the windows. Standard for the size of the design sounds are installed from the self-tapping self-tapping screws with a diameter of 4 mm. For larger blocks (with a diameter of 2x2 m), it is better to use larger self-tapping screws - 5-6 mm in diameter.
The fastening of the anchor strips to the butt end of the frame can be fixed in such a way that the stench will be installed with a croc of 6-8 cm on a stand of 10-15 cm from the side of the cut.

If so, it is necessary to properly install the window construction. When viewed superficially, the procedure can be made simple, but put before it with a lot of seriousness. The best thing at this stage is to enlist a supporter of help. One of you will take up the block, and the other will take up yoga resurrection.
Install the block at the openings and adjust the position for the help of the front preparation of the wedges. It is important to place the block vertically and horizontally. At which stage, follow the recommendations:
- Wedge the module not only from the bottom, but from both sides.
- Follow along, so that all vertical elements were located at a single plane.
- As an impost, place a wedge under it.
Reverse jealousy of the bloc for help. For the obviousness of the least, you correct them. І less than the last, proceed to the fixation of the module. For which, for additional anchor bolts or dowels, fix the anchor plates until the opening is empty. It is important that the elements were creased suvoro to the structures that they protect. To do this, you may need to see a ball of plaster at the place where the anchor plates are fixed.
After that, as you can securely fix the module, seal the seams behind the help, specially recognized for the purpose of the robotic pin. It is important that the material is intended for the installation of plastic windows. It is important to read the instruction and change it, that it can be tested at the humidity and temperature in the module installation room.
First, apply a pin, let the surface of the seam be wet with water. It is also necessary to fill in a boarder wider than 3 cm, to work at the 2nd stage with a first break.
