Arduino remote control for 30 channels. Arduino - works with IR signals - TSOP22 receiver (record IR signal). Controlling the Arduino board from MPC
Do you want to know how to control your booth with the help of a simple remote control? It's just that it's cheap to do it, just like you have an Arduino!
Axis you need:
Arduino (I use UNO)
- Model without soldering iron
- infrared primach
- Solder-free wire
- Whether there is a remote control

Connect infrared receiver to the breadboard and connect yoga to Arduino.
Connect the right pin to 5V Arduino, the center pin to GND, and the left pin to digital pin 11.

I have contributed to the IRremote library for arduino.
You can get yoga here:
Close the Arduino development environment and unzip it to the arduino/libraries folder.
Launch the Arduino IDE and open the IRrecvDemo sample sketch. Rewrite HEX to DEC as shown in the thumbnail. Get a sketch.

When the program is busy, open the last monitor and correct the push buttons on the remote control. If you all did good, you are to blame for the cody that they are.
Remember how the button was pressed and rob the notes about the code that they are. For example:
When the code 50088119 appeared, you pressed the up/down button
- Code 50073839, "Open/Close" button, etc.
The leather booth may have a TV remote control, or another remote control panel (DC). This attachment allows you to manage whether it is a kind of attachment on a vіdstanі, which is more convenient. You don't need to spend expensive calories and work hard. If you have any attachments and you would like to cherish them on the vіdstanі, then you can work remotely cheruvannya tsim pristroєm. For bazhannya you can work the remote control of the recreation center with your own hands, but for this you don’t need to use another story. Maybe you need a distance care? - everything is simple:
Lin is a quality that stuns the reports of majestic zusils to the point of reducing the amount of energy.
First, remote control in the world was shown by the winemaker Nikola Tesla; On this day, this technology has grown to the widest extent, just reached different ways transmission of commands (communication channel).
From the main channels, the call can be called:
- radio channel
- ultrasonic
- Infrared
In this article, we speak about the control of the attachment of an infrared remote control. Іnfrachervone vipromіnyuvannya - electromagnіtne vipromіnіvannya, which occupies the spectral region between the chervonim kіntsem of visible light and microviolin vibrіvіvannyam. Infrared vision is not visible to the human eye, but it can be used for additional cameras or video cameras. Most often, this is how they revise the practicality of the remote control for the TV in home minds.
Like a long time ago, on an old robot, I took the remote control and "Vichko" (ІК priymach) as a copy defense system, having been wallowing for a long time without a job and nareshti, I got out of my mind to reverify the robot.

Having solved this priymach, I succumbed to deak cunning; It was broken in order to accept the whims of both sides. And it’s handy, it’s not necessary to surround yourself with a singing kut to receive.

I also threw in a scheme with chotirma priymachi, I need to rapt. So, I accepted TSOP1836, but you can take others. To ensure a 360-degree reception, it is necessary to choose suitable and suitable receivers (with a wide receiver) and spread them as close as possible to each other. I didn’t mention problems with my receptionists. So throwing at the deposit paid fee that roztashuvannya elements.

To process commands, I naturally twist the arduino uno, as a receiver ICH can be twisted
TSOP34836 (higher range, but more expensive) or TL1838. You can take the remote control whether it is IK to navigate from the TV. Well, if you need your own remote control, then you can buy a kit for arduino.
Robotic principle:
When pressing on the button of the remote control, it sends the code of the button to the infrared light, after which the receiver receives the given code of the button, it sends it to the icon attachment, which is in the fall of the button, the code is changed.
So it is possible, for help, and hvil, it is possible to transmit information to a small distance. To transfer your commands or information, you can transfer it to a friend arduino with an IC transmission. Alas, the speed of such a transmission is already unseen. Up to the pluses of the infrared channel, there is insensitivity to electromagnetic transitions.
To receive arduino ІЧ signals, we can switch the ІЧ receiver as follows:

Give respect to the fact that the roztashuvannya nizhok at the primach can be irritated.


![]()
The receiver can have 3 legs, "+" and "-" life (mainly voltage 3.3-5V) and the leg of these itself transmits information to the attachment (our arduino plug). Life voltage for TSOP34836 2.7-5.5 volts. I am drawing 5 volts to the standard output of the arduino.
That firmware for arduino is extremely necessary. The robotic algorithm will be attacked: when you press on the top button remote control arduino turns on the relay, and when it is pressed again, it blinks. For the help of this relay, you can power up, for example, switch, but not obligatorily program the push buttons on the relay, you can enter a command into the computer or write a new operation in arduino, etc.
For the sake of simplicity, we will quicify a ready-made library. Firmware code:
#include
void setup()(
Serial.begin(9600);
irrecv.enableIRIn(); // Enable accept
pinMode(RELAY_PIN, OUTPUT); // Set the relay to exit
digitalWrite(RELAY_PIN,HIGH); //Set the highest value
}
void loop() (
if (irrecv.decode(&results)) (//to remove data
Serial.print("0x");
Serial.println(results.value, HEX); // Visnovok taken to the terminal
if ((results.value == 0x8FF40BF) ||(results.value == 0xD72040BF)) digitalWrite(RELAY_PIN, !digitalRead(RELAY_PIN));//as button code 0x8FF40BF or 0xD7
delay(200);// delay from the sling
irrecv.resume();// Take this value
}
}
I’ll explain the troubles according to the sketch:
if ((results.value == 0x8FF40BF) ||(results.value == 0xD72040BF)))
The value of the value is changed from "0x8FF40BF" and "0xD72040BF" - the codes of the buttons in the sixteenth system of calculation. Two meanings are less for the fact that I'm vicorist two remotes with unique codes.
digitalWrite(RELAY_PIN, !digitalRead(RELAY_PIN));
The standard procedure for digitally writing a pin behind a key is "digitalRead(RELAY_PIN)". Sign "!" means inversion, in our case inversion will become the digital output "RELAY_PIN".
Serial.print("0x");
Serial.println(results.value, HEX); // Visnovok taken to the terminal
These rows will display the truncated code terminal. At work program ce without consumption, but it is also necessary to recognize the required code of your other button. To do this, we start the sketch in Arduino, go to the terminal and click on the button to take the required code.
Also, the IRremote library has a copy of various applications, which can be corrected.
At the supplement to the article:
- sketch for arduino
- drukovana board for 4 sensors
ІЧ priymach and іnfrachervoniy remote control remote control - the widest and simplest way of keruvannya electronic equipment. The infrared spectrum of vibration is not visible to the human eye, but it is well accepted by IC receivers, as if they were inserted into electronic devices. The Arduino ir remote modules are designed to be handled by different equipment in direct line of sight.
Widespread zastosuvannya IH viprominuvachіv became possible zavdyaki їh low varstі, simplicity and brilliance in vikoristannі. ІH viprominyuvannya lie in the range of 750 to 1000 microns - the price is the closest part of the spectrum to the visible light. In the field of infrared technology, the optical power of various materials may change. Deyakі skla, for example, become opaque for ІЧ promenіv, paraffin navpak lucidity in the ІЧ spectrum.
Registration is being made for additional special photomaterials, on the basis of which primaries are prepared. Dzherelom infrachervonogo viprominyuvannya krіm heated bodies (Sun, lamps roasting chi candles), can be solid-state attachments - ІCh svіtlodiod, laser. Vyprominyuvannya in the infrared range may have a number of features, zavdyaki їх manually vikoristovuvat in consoles:
- Solid colors viprominuvach (ІЧ svіtlodіodi) are made cheaply and the stench is compact.
- Infrared changes are not accepted and are not fixed by the human eye.
- ІЧ priymachi also cost cheaply, and the stench may be small rosemіri.
- Small shifts, shards transmitting and receiving on one frequency.
- Vidsutnіy negative impact on healthy people.
- A high indicator of the use of large materials.
- IR viprominuvachі do not add to the work of other outbuildings.
 The remote control works in this way. When pressing the button, the signal is coded in the infrared light, the receiver receives it and picks up the necessary signal. The information is encoded as a logical sequence of packets of impulses with a singing frequency. Priymach otrimu tsyu sledovnistost and vikonu demoduljuvannya data. For the receiving signal, a microcircuit is used, in which there is a photodetector (photodiode), a switch, a smug filter, a demodulator (a detector that allows you to see the signal that lights up) and an output transistor. Also, they have installed filters - electrical and optical. Such an attachment with a winder up to 40 meters is used. ІХ method of transferring data is used in rich outbuildings: butt fittings, industrial technology, computers, fiber optic lines.
Arduino IR receiver
To read the IR signal, you need the Arduino board itself, a breadboard, an IR signal receiver and jumpers. Use the impersonal primaries, but it’s better to use TSOP312 or other options for Arduino. Data from the receiver console can be transmitted using the RC5 or NEC protocol.
In order to determine how low it is, it is necessary to look at the sensor from the side of the receiver. Then on the receiver, the central contact is the earth, the left hand is out to the microcontroller, the right hand is life.


For clarity, you can use ready-made IR receiver modules.


Connecting IR receiver to arduino
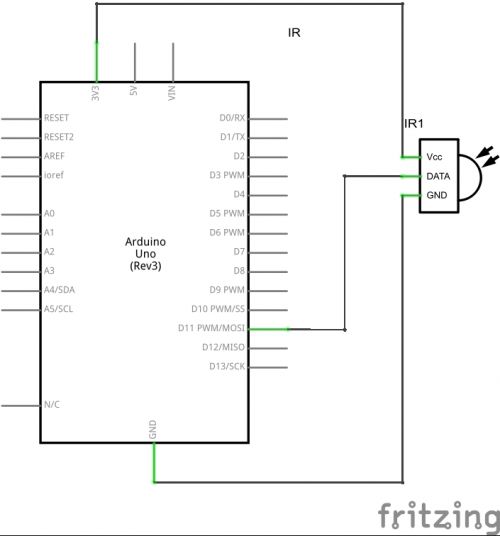
Connect IR receiver to Arduino to GND ports, 5V and digital input. The scheme for connecting the sensor to digital 11 pin is shown below.
The axis looks like this: a diagram with an infrared priming module:

Libraries for robotics with IR
For work with ІCh attachments, you can use the IRremote library, which allows you to ask for help systems. You can take over the library. If you're interested, copy the files to the \arduino\libraries folder. To connect to your library sketch, you need to add the header file #include
To read the information, use the IRrecvDumpV2 butt from the library. Since the remote control is already in the list of knowledge, it is not necessary to scan. To read the codes, you need to run the ARduino IDE and open the IRrecvDemo butt from IRremote.
Another library to work with IC signals - ce IRLib. Vaughn is similar for its functionality to the front. Paired with IRremote in IRLib - butt of assigning the frequency of the IC sensor. Ale first, the library is simpler and more efficient than that of vikoristan.
If the library is busy, you can start reading the canceled signals. For which victorious code is coming.
The decode_results operator is needed to assign the name of the received signal to the changed results .
The code needs to rewrite HEX to DEC.
When the program is busy, you need to open the last monitor and press the buttons on the remote control. Different codes will appear on the screen. It is necessary to create a sign about those buttons that can be used to remove the code. The best way to take the data is to write it down in the table. The next code can be written into the program so that it can be copied with an attachment. Kodi is recorded in the memory of the Arduino board EEPROM, which is already manual, so you won’t be able to program the buttons when the skin remote control is turned on.
Buvaє, scho for the zavantazhennya program you can see the pardon "TDK2 was not declared In his scope". To fix it, you need to go to the explorer, go to the folder where the Arduino IDE program is installed and remove the IRremoteTools.cpp and IRremoteTools.h files. After that, it is necessary to re-install the program on the microcontroller.
Visnovok
Using the Arduino ir remote will make life easier for a koristuvach. A mobile phone, a tablet or a computer can act as a remote control for remote control - for which one needs special software. For the help of Arduino, you can centralize everything. With one button on the remote control, you can turn on the TV and Blu-Ray at once.
To all the good hour of the day (or the night, as you wish), let's start with a lyrical entry. At the same time, at the bagatioh booths є TV set with remote control, tuner, DVD player . A lot of people (and s_m'ї) can't imagine their home life without a remote control in their hands. Wait a minute - it’s great to be the master of home appliances, and be-like dictating your will to these people. In this article, we would like to take a look at the technology of remote curing more lost, and bring some deuces to apply for your needs.
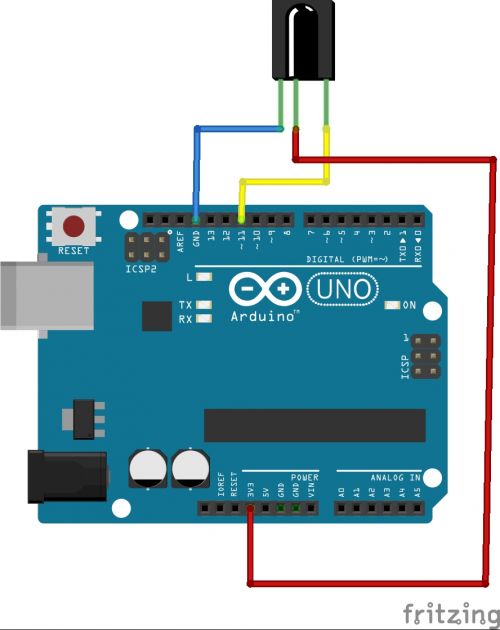
Father, what do we need as a component for our experiment? Yak option ready-made modules of the IC remote control and the IC receiver are for sale. But we don’t want to check and pay pennies, to that diatima hardcorner. We take as a basis the remote control of the invisible trip, so we also pay a small amount of money from a Chinese tuner for how to solder an infrared receiver. In the photo below you can see the accessories and accessories. As a matter of fact, the DC remote control was used for knowledge of the middle of non-common junk in the office desk, and the fee for the IC-receiver was taken in the nearest radio master.

Well, so what, yak kaz Hannibal - "Forward to Carthage" . We just need to pay the receiver and connect yoga before paying Arduino behind the diagram below...
- Connecting the IC receiver
IC receiver some kind of soldering for pay can’t be branded, it’s just a black and white Chinese radio component, of which thousands have been released. In short, we can say - in one building, wines are combinedphotodiode . At the exit, a splendid one is formedTTL signal without filling, attached for further processing by a microcontroller. The frequency that you carry is possible (!) 36 kHz, but at the same time it’s not so important ... Just try to connect it to payArduino , Umovna scheme will give the necessary pinout of this device. On the diagram below, you can see the chervonim - the same form of the corps as our vikonovIC receiver , seen in green - pinning for a certain connection fee before payingArduino .

Respect!!! On the Internet, there are a lot of pinout schemes for fittings in such a case (TSOP). The pinning, which is induced in this article, may not be possible with any knowledge on the Internet, but everything is connected to us in this way. Even if the IC-receiver is connected, it starts to heat up - immediately vimikate selected scheme, it means that the pinning of the connection is not valid, and you happen to pick it up practically navmannya. We did it ourselves, because the schemes found on the Internet did not fit for our infrared receiver. Here, in a flash, it’s a hell of a lot not to burn the Arduino board, be careful !!!
- IRremote library
Otzhe, everything is connected. To read the code from the remote keypad IRremote.h, for the most part, our remote control, or rather the code of the buttons, will help you. Nadalі vikoristovuєmo read the code with the method. Sketch, for the help of which you will read the code of buttons, views in the butts of the library, called wine IRrecvDemo. Respect!!! When compiling the sketch, it looks like a pardon, on the very cob it is necessary to add two more libraries that are connected:
#include "boarddefs.h" //Additional library #include "IRremote.h" #include "IRremoteInt.h" //Additional library int RECV_PIN = 2; //Pin for connecting the output signal from the IF receiver //Creating an instance to the IRrecv class, as a parameter, passing the pin for connecting the IF receiver signal IRrecv irrecv(RECV_PIN); decode_results; //Change to save the decoded code of the pressed button void setup() ( Serial.begin(9600); irrecv.enableIRIn(); //Enable the IC receiver in the robot ) void loop() ( if (irrecv.decode(&results)) //Serial.println(results.value, HEX); //Displayed in the monitor port the code of the pressed button in hexadecimal form irrecv.resume(); //Reading the value/button coming) delay(100 );
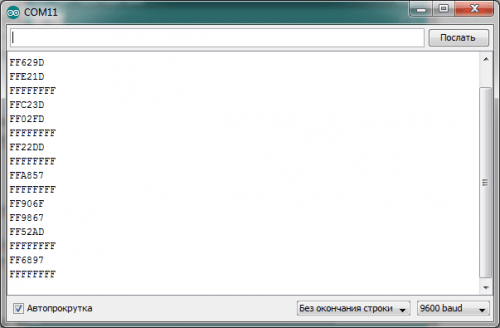
After that, the sketch was filled with a feeArduino(we vikoristuemo Arduino Nano on the shield I/O Wireless Shield for Nano ), you can check port monitor that marvels at how the codes appear at the push of buttons on the remote control panel. The result of the robotic sketch of representations is on the screenshot below:

Before speech, yak port monitor mi vikoristovuєmo svіy perepіrenі software, yakshko komus tsіkavo - you can read the article and take advantage of Serial Monitor Pro.
#define KEY_ONOFF 0x807F807F //Кнопка Включения/Выключения #define KEY_MUTE 0x807F48B7 //Кнопка Mute #define KEY_1 0x807F00FF //Кнопка 1 #define KEY_2 0x807FE01F //Кнопка 2 #define KEY_3 0x807F609F //Кнопка 3 #define KEY_4 0x807F20DF //Кнопка 4 #define KEY_5 0x807FD02F //Button 5 #define KEY_6 0x807F50AF //Button 6 #define KEY_7 0x807F10EF //Button 7 #define KEY_8 0x807FF00F //Button 8 #define KEY_9 0x807F708F //Button 9 #define KEY07x8
І axis now, everything is ready for the final test - it will be an elementary test of the control of the switched on / mics of the relay modules. We will introduce a small task:
- Vikoristovuemo two relay modules
- Relay No. 1 is tied to the button "1" of the remote control
- Relay No. 2 is tied to the button "2" of the remote control
- Emphasis on any of the relay modules zdijsnyuetsya pushing on the button, to the point of binding.
- Vimknennya whether any of the relay modules also zdіysnyuєtsya pushing on the button, to any faults of binding.
- Pressing on the On / Off button insanely vibrates the relay modules (for example, the stench was turned on, or one of them was turned on)
Sketch, which implements a higher purpose of the task:
#include "boarddefs.h" //Additional library #include "IRremote.h" #include "IRremoteInt.h" //Additional library #define KEY_ONOFF 0x807F807F //Notify/Unmute button #define KEY_1 0x80 0x807FE01F //Button 2 #define RELOUT1 3 //Output port for relay 1 #define RELOUT2 4 //Output port for relay 2 int RECV_PIN = 2; IRrecv irrecv(RECV_PIN); decode_results; static boolean REL1_ONOFF = false; static boolean REL2_ONOFF = false; void setup() ( pinMode(RELOUT1, OUTPUT); pinMode(RELOUT2, OUTPUT); Serial.begin(9600); irrecv.enableIRIn(); // Start the receiver ) void loop() ( if (irrecv.decode(&results ) )) ( switch(results.value) ( case(KEY_ONOFF): REL1_ONOFF = false; REL2_ONOFF = false; break; case(KEY_1): if(REL1_ONOFF) REL1_ONOFF = false; else REL1_ONOFF = true; break; if( REL2_ONOFF) REL2_ONOFF = false;else REL2_ONOFF = true;break; ) irrecv.resume(); ) digitalWrite(RELOUT1, REL1_ONOFF);
For example, stats - video, as if demonstrating to the robot both sketches. For bajannya and manifestness of creative imagination, it is possible to expand the park of modules that are connected, and more and more are pushed through. We have tried to establish a basic butt of zastosuvannya tsієї tekhnologii in our article. Dyakuёmo for respect, I will look at it again!
Please, add JavaScript for robots with comments.
Today's article will look at the connection of the TSOP34836 IC receiver to the Aduino UNO board. For these purposes, you can zastosuvat whether you have a priymach, smart with your remote control over the frequency. Appointment visnovkіv shown little.
1. Vout - out of the primach.
2. GND - "ground", galny wire.
3. Vcc - eating.
The transmission of data from the IC remote control to the reception is carried out according to the RC5 protocol, which is a sequence of impulses. The connection is made for the offensive scheme.
And zіbravshi, we take approximately the following:
To process the data that is transmitted by the remote control, the IRremote library has been added, this library is attached to the article. Paste the following code:
#include "IRremote.h" IRrecv irrecv(11); // Specify the pin of which the receiver is enabled decode_results results; void setup() ( Serial.begin(9600); // Installing the security on the COM port irrecv.enableIRIn(); // Starting the receive ) void loop() ( if (irrecv.decode(&results)) // When the data arrived ( Serial .println(results.value, HEX); // Resume given to console irrecv.resume(); // Accept command ) )
Now, in the COM console, you can generate a key code for the port that will be pressed into the HEX.
Axis i all now you can twist the scheme in your outbuildings. Below is the butt of one of the practical zastosuvan ІЧ - primach.
As a demonstration, it will be shown how to use a servo machine for an additional IC remote control.
Attached scheme:

The axis looks so out of place:
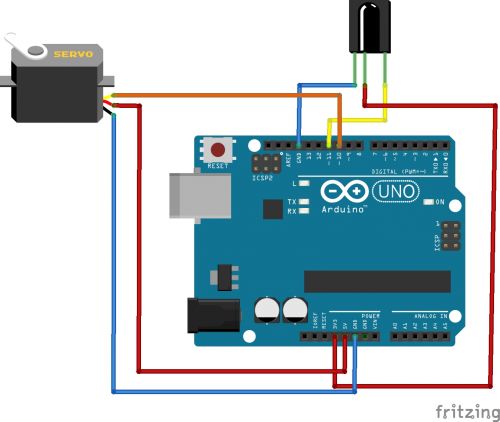
For robots, I will add a victorious code:
#include "Servo.h" #include "IRremote.h" IRrecv irrecv(11); decode_results; Servo main; intservPoz = 90; // Pochatkovo servi camp int lastPoz = 0; void setup() ( irrecv.enableIRIn(); servoMain.attach(10); // Servo attaches up to 10 attachments servoMain.write(servPoz); ) void loop() ( if (irrecv.decode(&results)) ( int res res = results.value;Serial.println(res, HEX); 0xFFFFA857)// The "-" button was pressed ( servPoz--; lastPoz=res; servoMain.write(servPoz); ) else if(res==0xFFFFFFFF) // Likewise, trim the button ( if(lastPoz==0xFFFF906F) serv // Trim "+" if(lastPoz==0xFFFFA857) servPoz--; // Trim "-" servoMain.write(servPoz); ) irrecv.resume() ;delay(100); ) )
The control panel vikoristovuetsya like a Chinese one, with the pressure "+" the servo wraps in one beat, with the pressure "-", in another.
